Gavilan
Administrator
Admin
Posts: 203
|
Post by Gavilan on Oct 21, 2006 13:30:57 GMT -5
Very good. -nods- A+
Now, for the final touches. I want you to go here:
www.dafont.com/theme.php?cat=601
And download your favorite font on that page. Then, after you have downloaded it write 'Esprit' on the picture somewhere convenient. I would suggest the top right where there is all that extra sky, but it is your choice. Make the font black, then I want you to change the style. If you dont have the styles window open, open it by goignt o Windows > Styles. Then click on the little arrow in the top left of the style bar thing, and scroll down to 'text effects.' It should replace your styles, if it doesn't..then it was probably on that already, and that's fine. Highlight your font and choose the 'Frosted Glass Style'. After that, a little 'f' should appear next to your layer on the layers palette. Click on the little arrow next to the 'f' to see what effects were used on your text when you chose 'frosted Glass'. There should be 'Satin' and 'Bevel and Emboss'. Click and drag the Bevel aand Emboss to the trash, deleteing it. Then change the fill (under opacity) of your layer to O. Whala! A fancy font effect! ^^
Show it to me, even if it barely shows up. -nods- If it barely shows up, i will help you with what to do.
|
|
Esprit
Global Moderator
Queen - Torrid Cove
you show me [continents] I see [islands]
Posts: 85
|
Post by Esprit on Oct 21, 2006 14:24:19 GMT -5
|
|
Gavilan
Administrator
Admin
Posts: 203
|
Post by Gavilan on Oct 21, 2006 14:28:01 GMT -5
Good. 'A'
Okay, now make the font a bit bigger, so it fills in that area better. then after that, come up with a quote and type it in. Change the font to 'Times New Roma' at 12px. Place it underneath the name, duplicate the layer, go to Filter ? Motion Blur > Hit 'rasterise when the popup comes > Motion Blur the font at about 45 - 50. Cool, no?
Next, if you have any textures or effects you want to add, go ahead. Then put your copyright on it, and you are done!
|
|
Esprit
Global Moderator
Queen - Torrid Cove
you show me [continents] I see [islands]
Posts: 85
|
Post by Esprit on Oct 21, 2006 14:40:47 GMT -5
|
|
Gavilan
Administrator
Admin
Posts: 203
|
Post by Gavilan on Oct 21, 2006 14:56:54 GMT -5
Nice. But the name is too blurry, B+
You could fix that up if you want, but you don't have too. -nods- Our next lesson is to create a texture. It will be a line pattern.
So, open up a new black documenrt about 8 inches by 8 inches. Then create two layers. The bottom should be white, and the top should be blank. With NOTHING on it, not even white.
Change your brushed to the square brushed list by clicking on the down arrow beside your brushes preview, then the side arrow. Choose a 1pc hard square brush, and make your color black. Then estimate what you think is about a pixel from the top of your document and click. Before moving the mouse, hold down shift, thenm create a straight horizontal line on the blank layer. Estimate what you think is about another pixel from your last line, and draw another one. Then duplicate the layer, and drag the two little lines so there are four vertical lines on two different transparent layers. Merge the two, duplicate, and drag so there are eight little black lines on two different transparent layers. Merge, and do the same until your entire document is covered in little 1-pixel black lines that are 1-pixel apart. They MUST be on a separate layer from the bottom that is transparent, or else you will not be able to drag them and leave the white behind. Save it as a photoshop document, as well as a jpg to show to me.
|
|
Esprit
Global Moderator
Queen - Torrid Cove
you show me [continents] I see [islands]
Posts: 85
|
Post by Esprit on Oct 21, 2006 20:08:40 GMT -5
|
|
Gavilan
Administrator
Admin
Posts: 203
|
Post by Gavilan on Oct 21, 2006 20:30:52 GMT -5
It's fine. B
Well, I actually meant 1px apart...yours are about...2-3px apart, but oh well. They are fine. Now, I want you to drag your pattern over your Esprit picture, and do the font effect thing on it just as you did with the text. Fill to 0, no Bevel and Emboss. Now your pic will have a texture. ^^
|
|
Esprit
Global Moderator
Queen - Torrid Cove
you show me [continents] I see [islands]
Posts: 85
|
Post by Esprit on Oct 21, 2006 22:30:52 GMT -5
|
|
Gavilan
Administrator
Admin
Posts: 203
|
Post by Gavilan on Oct 21, 2006 22:32:23 GMT -5
WOW. Very nice picture, Amo.
You are done! -claps- That is an A++++++++++++
Okay, so your next lesson is going to be pretteh fun. You get to colorize! Now, I will let you choose....colorize a human or a horse?
|
|
Gavilan
Administrator
Admin
Posts: 203
|
Post by Gavilan on Oct 21, 2006 22:41:03 GMT -5
And I love the new font. -nods- Also, don't forget to put your copyright on it, Amo!
|
|
Esprit
Global Moderator
Queen - Torrid Cove
you show me [continents] I see [islands]
Posts: 85
|
Post by Esprit on Oct 21, 2006 23:07:33 GMT -5
I won't. >) I was just too lazy to put it on at the moment. Also, I think I want to colorize a horse. -nod
|
|
Gavilan
Administrator
Admin
Posts: 203
|
Post by Gavilan on Oct 22, 2006 0:36:35 GMT -5
Ok. A horse it is then. Here is the picyou shall use:
www.2hottotrot.com/data/547/medium/black_and_white.jpg
I want the horse to be dark brown and the mane to be creamy, okay? The beach should be a sandy color, and the water blue. The sky can be blue or whatever. Just make it look nice. ^^ Alrighty, so duplicate the layers and you will work on the top one. To get the main brush you will use in this assignment, click and hold down on the paintbrush tool. Three other options shouod pop up beside it after that. They shouod be 'Brush Tool', 'Pencil Tool', and 'Color Replacement Tool'. We want the color replacement one, so select it.
Now look at the options at the top, where you can change your settings for the tool. Brush size should be however big you want, a soft brush. Mode must be color, the first little option in the eyedropper box-thingys should be selected, Limits should be discontuiguos, tolerance 100, and the anti-alias box should be CHECKED.
WIth that set, go to your color pallete and choose a fairly dark broown and go over the horses body with it. It will be very light, so you will have to use the burn tool to darken the brown. For the mane, select a light creamy orange/yellow/gold color and go over the mane, so it looks flaxen. Colorize the entire picture before you do ANY smudging. When you are colorizing, many of the shadowed areas will become pixellated. No worries. After you are done colorizing the pic, simply smudge them so they are not pixellated any longer.
|
|
Esprit
Global Moderator
Queen - Torrid Cove
you show me [continents] I see [islands]
Posts: 85
|
Post by Esprit on Oct 22, 2006 2:26:50 GMT -5
|
|
Gavilan
Administrator
Admin
Posts: 203
|
Post by Gavilan on Oct 22, 2006 3:08:11 GMT -5
|
|
Saence
King
King - Torrid Cove
Posts: 261
|
Post by Saence on Oct 22, 2006 12:29:21 GMT -5
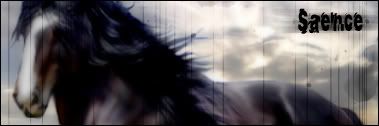
-blink-
I don't even want to show you guys the picture I made. It seems horrid compared to this.
-sigh-
I really need Photoshop. |
|